Reading Lounges Preferences – Introduction
1. Concept
Reading Lounges are groups of users that organize themselves loosely in a community, which gives them the ability to organize and exchange information amongst each other. The Reading Lounges can be based on common interests (e.g. Detectives, Cooking), age (e.g. Children, Youth), geography (e.g. people living in the same area) or any other criterion for that matter.
A Reading Lounge has one or more related Reading Lists. A Reading List is a list of references to documents. Currently there can be two types of references:
· references to documents (bibliographic records) in the local catalogue(s)
· references to URL's
It is not mandatory that a Reading List belongs to a Reading Lounge. A user can also create his own private Reading Lists that does not belong to any Reading Lounge.
It is possible that a Reading List belongs to multiple Reading Lounges. E.g. my own list contains all my detectives at home; it can belong to the Reading Lounge "detectives" and to the Reading Lounge "30+".
An example
A user has five Reading Lists attached to his account. These are:
· a private list that contains the books which he still wants to read
· a private list that contains the DVDs which he still wants to watch
· a list of all the books he has at home (his private home collection) – this is a personal list, but he shares it with other people, i.e. they are permitted to look at it
· a shared list that belongs to the Reading Lounge "Computer Games" – this is a shared list that is maintained by the 25 people that are subscribed to the Reading Lounge on computer games
· a shared list that belongs to the Reading Lounge "Movies" – this is a shared list that is maintained by the people that are subscribed to the Reading Lounge on movies
Reading Lounge membership & access
Membership of Reading Lounges
Users can enrol themselves for such a Reading Lounge. Only users that are registered in the borrower database can be members of a Reading Lounge. For some Reading Lounges an acceptation procedure may be in place. In that case the user applies for membership and will be notified by e-mail about whether membership is granted or not.
Every user who wants to become member of a Reading Lounge must have an "alias" and a "personal description". When these are not yet defined, a popup form will be shown in which the required data can be entered.
The alias and description can be modified on a per lounge base, but this is not mandatory.
For some Reading Lounges the user can also specify if (s)he wants to hide his/her name to other users, or even if (s)he does not want to be visible at all to other users. Note that the availability of this option also depends upon the Reading Lounge settings.
Members may be allowed to add Reading Lists to the lounge, this depends upon the lounge settings.
Access to Reading Lounges
Access to Reading Lounges in the WebOpac is through menu buttons or from the "User Activities" menu.
It will be possible to access a Reading Lounge without the need to log on. This will give users only the right to view the lounges and their Reading Lists. If the user wants to edit data or view more details, (s)he will have to log on.
1.2 Reading Lists
Reading Lists are temporary "containers" that hold references to documents. These can be documents in the local bibliographic database(s) or URL's.
Reading Lists can be linked to one or more Reading Lounges, but they can also exist on their own (these are also accessible through the "User Activities" and several menus).
See the help of the WebOpac Preferences – Reading lists per profile for more information on this feature.
2. Setup
Setup for this functionality consists of two parts:
Reading Lounge preferences
Reading Lounges have their own preferences, called through the page ReadingLoungesPrefs.csp.
Here you can set up different Reading Lounges, manage member access, define messages for the users, and manage Reading Lists.
WebOpac preferences
Reading Lounge options are added to the "User Activities" page ("Main Menu" section). Also buttons for Reading Lounges are added to the "Menus" page.
Note
Always remember to click the button (usually right at the bottom of the screen) to save any changes you have made.
![]()
Note
Most of the fields where you can enter your own texts have an undo button:
![]()
Clicking this button will restore the standard texts as provided by Infor.
3. Logging in
To access the Reading Lounges Preferences Setup pages, use the following url:
http://server name or number/webopac/ReadingLoungesPrefs.csp
Once this address is selected, the user will be taken to the logon screen for the setting up of preferences of the Reading Lounges.

Once you have logged in, you will see the Start Screen for the Reading Lounges Preferences Setup.
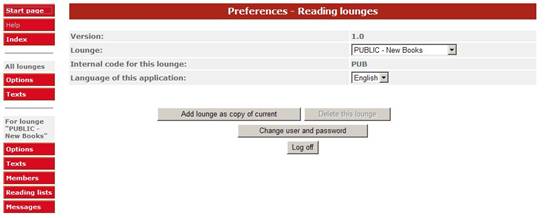
There are several parameters that allow you to customise the Reading Lounges for your particular site. The use of profiles allows you and your customers several options in the way they can search the Reading Lounges, for example using differing search methods, or different languages.
You should:
· decide how many profiles you require
· define All Profiles under options and texts
· define individual profiles and define the content/rules of each of these.
· Print out the pages as you change them. This will help to see what modifications you have made.
4. Main screen
Options on the main screen
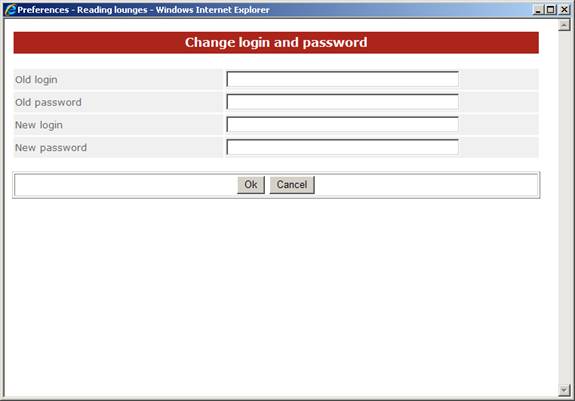
: This option allows you to change the password to access the Reading Lounges Preferences screens. After choosing this option, the following screen will be displayed:
Note
You should change the default login and password so that unauthorised people cannot enter the Preference pages. A message is displayed until you do change the login and password.
: This option allows you to copy an existing profile, thereby reducing setup time. The use of profiles allows you to create several different Reading Lounges. Parameters, text wording, position on the page, language, and search methods, can all be defined separately for each lounge.
· Select the lounge that you want to copy in the Lounge: field drop-down box:
![]()
· Click the button
After choosing this option, the following screen will be displayed:
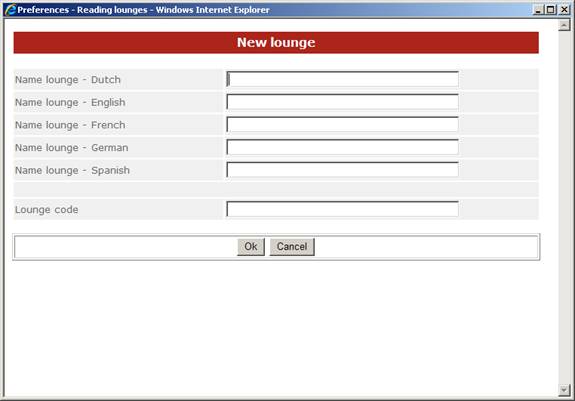
· Enter the new name for your lounge. You must add a name for each language displayed.
· Enter a code for the e. This is the code used in the url (see section above), and is displayed on the Start page as the Internal code for this lounge.
· Click the button
The Set Preferences page now shows this new name in the Lounge field.
When defining a lounge, you should keep the codename of the lounge clear and simple.
Note
When a new lounge is created it is enabled by default.
: This option allows you to delete a lounge. You cannot delete the default (base) lounge definition.
: use this options to exit the preferences tool.
All the options on the left hand side of the main screen are discussed in separate help documents for each section.